File 1 : wireless_module.pdf file://C:\Program Files\OPNET\14.5.A\doc\modeler\ModTut\ModTut-06-1.html OPNET modeler Tutorial : Creating a Wireless Network in opnet > Using the Time Controller
File 2: wimaxMAC.pdf Paper : A software WiMAX medium access control layer using massively multithreaded processors IBM J. RES. & DEV. VOL. 54 NO. 1 PAPER 9 JANUARY/FEBRUARY 2010
File 4: Selected_Topics_in_WiMAX.pdf (BOOK) On MU-MIMO Precoding Techniques for WiMAX PAPR Reduction in WiMAX System A Mobile WiMAX Mesh Network with Routing Techniques and Quality of Service Mechanisms Hybrid AHP and TOPSIS Methods Based Cell Selection (HATCS) Scheme for Mobile WiMAX EAP-CRA for WiMAX, WLAN and 4G LTE Interoperability Key Management in Mobile WiMAX Networks
File 5: Opnetwork2011_paul_lally_final_2.pdf PAPER: Simulation and Performance Evaluation of WiFi and WiMAX using OPNET Ravinder Paul, Sukhchandan Lally, and Ljiljana Trajković Simon Fraser University Vancouver, British Columbia Canada
File 6: OpnetTu.pdf Presentation Tutorials: Simulating Computer Networks with Opnet for beginners.
File 7&8: Opnet_esittely_07-08.pdf Presentation Tutorials: Simulations and Tools for Telecommunications 521365S: OPNET - Network
Simulator
File 9: Full Report: Implementation of a WiMAX simulator in Simulink Ausgeführt zum Zwecke der Erlangung des akademischen Grades eines Diplom-Ingenieurs unter Leitung von Univ.Prof. Dipl.-Ing. Dr.techn. Markus Rupp Dipl.-Ing. Christian Mehlführer
File 10: FULLTEXT01_4.pdf Full Report: Analyzing IP/MPLS as Fault Tolerant Network Architecture Examensarbete utfört i Informationskodning vid Tekniska Högskolan i Linköping av Muhammad Roohan Kebria
File 11: af_final_project_2.pdf Full Report: OPNET Simulation of IEEE 802.11(WiFi) and IEEE 802.16(WiMAX) in a small area Azadeh Farzin
File 12: [Emad_Aboelela]_Network_Simulation_Experiments_Man(BookZZ.org).pdf BOOK: NETWORK SIMULATION EXPERIMENTS MANUAL Prepared by Emad Aboelela, Ph.D. University of Massachusetts Dartmouth
File 13: 427project-final.pdf ENSC 427: COMMUNICATION NETWORKS Video and Voice Backup over Mobile WiMAX
File 14:0812wmn15.pdf PAPER: VERTICAL HANDOFF IN WLAN-WIMAX-LTE HETEROGENEOUS NETWORKS THROUGH GATEWAY RELOCATION L. Nithyanandan and I. Parthiban Department of Electronics and Communication Engineering, Pondicherry Engineering College, Puducherry, India International Journal of Wireless & Mobile Networks (IJWMN) Vol. 4, No. 4, August 2012
File 15: 1003.1479.pdf PAPER: Analysis, Modification, and Implementation(AMI) of Scheduling Algorithm for the IEEE 802.116e (Mobile WiMAX) (IJCSIS) International Journal of Computer Science and Information Security,Vol. 7, No. 2, 2010 C. Ravichandiran , Dr. C. Pethuru Raj, Dr. V. Vaidhyanathan
File 16: 1004.4583.pdf PAPER: Measuring Data and VoIP Traffic in WiMAX Networks Iwan Adhicandra JOURNAL OF TELECOMMUNICATIONS, VOLUME 2, ISSUE 1, APRIL 2010
File 17: 1571_pres.pdf Persentation restricted session : Session 1571 Planning WiMAX Network Deployments R&D Solutions for Commercial and Defense Networks
File 18: 1603.952.pdf WiMAX-RBDS-Sim: An OPNET Simulation Framework for IEEE 802.16 Mesh Networks Gustavo Vejarano , Janise McNair SIMUTools 2010 March 15-19, Torremolinos, Malaga, Spain. Copyright 2010 ICST 78-963-9799-87-5
File 19: Abhishek+(1).pdf Full Report: VERTICAL AND HORIZONTAL HANDOVER IN HETEROGENEOUS WIRELESS NETWORKS MASTER OF ENGINEERING IN ELECTRONICS AND COMMUNICATION ENGINEERING Submitted By: Abhishek Dhiman
File 20: article1380788712_Khan et al.pdf PAPER: Interworking between WiMAX and UMTS to provide seamless services M. M. A. Khan*, M. F. B. Ismail and K Dimyati International Journal of the Physical Sciences Vol. 5(6), pp. 852-864, June, 2010
File 21: fatema_shaikh_final_thesis.pdf PAPER: Intelligent Proactive Handover and QoS Management using TBVH in Heterogeneous Networks BY: Fatema Sabeen Shaikh
File 22: IJCNS_paper9.pdf PAPER: Seamless Handover between UMTS and GPRS Mushtaq Md. Arman Khan and Mohd Faizal Bin Ismail International Journal of Communication Network and Security (IJCNS), Vol-1, Issue-3 ISSN: 2231
-1882
File 23: IJECET 2013.pdf PAPER: PERFORMANCE AND HANDOFF EVALUATION OF HETEROGENEOUS WIRELESS NETWORKS (HWNS) USING OPNET SIMULATOR Dheyaa Jasim Kadhim , Sanaa Shaker Abed Electrical Engineering Department, University of Baghdad INTERNATIONAL JOURNAL OF ELECTRONICS AND COMMUNICATION ENGINEERING & TECHNOLOGY (IJECET)
File 24: IJPTT-V3I4P14.pdf PAPER: Simulation of Physical layer of WiMAX Network using OPNET Modeller Narendra Bagoria, Anita Garhwal, Anurag Sharma International Journal of P2P Network Trends and Technology (IJPTT) - Volume3 Issue4- May 2013
File 25: IJRET_110319137.pdf PAPER: MOBILITY MANAGEMENT IN HETEROGENEOUS WIRELESS NETWORKS G. Zayaraz, J. Kanchana Devi, V. Vijayalakshmi, V. Hemamalini IJRET: International Journal of Research in Engineering and Technology eISSN: 2319-1163 | pISSN: 2321-7308
File 26: Karl_Andersson_Doc2010.pdf DOCTORAL THESIS : On Access Network Selection Models and Mobility Support in Heterogeneous Wireless Networks BY: Karl Andersson
File 27: Opnetwork2011_al-rousan_altrad_final.pdf PAPER: Dual-Trigger Handover Algorithm for WiMAX Technology Nabil Al-Rousan, Omar Altrad, and Ljiljana Trajković Simon Fraser University
File 28: Simulations_of_WiMAX_using_OPNET_Simulator.pdf Presentation: ENSC 895: Communication Networks: Final Project Presentation Simulations of WiMAX using OPNET Simulator BY: Sukhchandan Lally
File 29: Thesis.pdf Thesis: INVESTIGATION OF HANDOVERS IN 3G UMTS TRAFFIC CLASSES Maqsood Muhammad Khan, Muhammad Saad Khan
File 30: V3I11-0178.pdf PAPER: Performance Analysis of a Mobile WiMAX Network in Node Mobility under Different Scenarios Jupinder Singh Sachin Majithia International Journal of Advanced Research in Computer Science and Software Engineering Volume 3, Issue 11, November 2013 ISSN: 2277 128X
File 32: WiMAXLab2withjharakeshnetworks.com.pdf Opnet resticted Presentation session: Session 1579 *** Understanding WiMAX Model Internals and Interfaces *** (Network R&D) if you want a good reference on WIMAX in OPNET start with this present
If you’re running iOS 7 beta, you’ve given up the right to a jailbreak if you don’t have any other eligable iOS devices. Unfortunately, there’s no jailbreak for iOS 7 beta, and even after its official release, it may be a while before we see one.
The good news is, if you happened to have an iPhone 4, there’s now a way to gain full r/w root access with iOS 7 beta installed. While this isn’t a jailbreak, it’s the next best thing to be able to explore all of the root files on your device and make changes as you see fit.
I’m not a developer or a hacker, but I’ll explain this process in a way that should be easy to understand. We’ve been provided instructions (original source via NmUn on iFans) on how to enable acf2 on an iPhone 4 running iOS 7 beta 1, and we’re sharing it with you today. Remember, this requires that you have an iPhone 4. Unfortunately, this method will not work on any A5+ devices. If you meet that requirement, and you’re running iOS 7 beta, continue on with this tutorial. This process will work on OS X or Windows and has been tested with iOS 7 beta 1.
You’ll need the following applications to get started:
We’ve put together a detailed video tutorial of this method in action. As shown in the video and explained below, this method will give you full read and write access to the iPhone’s root file system.
If the RAMDisk tool has the init mux error, you need Java 6 update 35 for 32bit. So look it up and install it. You’ll also need to remove Java 7 for 32bit for it to use Java 6. If you’re on a 64bit PC just install Java 7 64bit and uninstall the Java 7 32bit.
RAMDisk tool successful.
Step 2: Launch CyberDuck or WinSCP and connect to localhost on port 2022 with the username “root” and the password “alpine.” (Both entered without the quotation marks.)
Step 3: Open a terminal window using the SSH connection. Most SSH clients will have a dedicated button for this. If you’re unsure of the process check the video or read through the help section for your SSH client. Within Terminal type in the command “mount.sh” and press enter.
If this is successful you should see the following:
Mounting /dev/disk0s1s1 on /mnt1 Mounting /dev/disk0s1s2 on /mnt2
Now you can close the terminal window.
Step 4: Within the SSH client, navigate to /mnt1/etc and look for a file named “fstab” in that folder. Make a copy of fstab on your desktop and change the name of the file on the device to “fstab.old” without the quotation marks.
Step 5.
Step 5: Open the fstab file on your desktop using TextEdit or NotePad depending on your operating system. Within this file, you’re going to need to change something in the first line. Change “/dev/disk0s1s1 / hfs ro 0 1″ to read “/dev/disk0s1s1 / hfs rw 0 1″ omitting the quotation marks. Once you’re finished, save the file and copy it back to the device. Make sure you set its permissions to 0644.
Step 6: Navigate to /mnt1/System/Library/Lockdown and copy the “Services.plist” file to your desktop. Next, change the name of the file on the device to “Services.plist.old” without the quotation marks.
Step 7: Open the Services.plist in your preferred binary plist editor and add the following (plain text via Pastie.org found here) entries below the “com.apple.afc” section:
Next, save the plist file and copy it back to your device. Make sure that you set its permissions to 0644.
When you’re done with step 7, it should look like this.
Step 8: Launch a new terminal window through the SSH client and type “halt” (without the quotation marks) and press enter. The device will turn off and start back up in Recovery Mode. Note: You may need to manually turn on the device.
Use TinyUmbrella to exit Recovery Mode.
Step 9: Launch TinyUmbrella, select your device from the list on the left side of the application, and click on “Exit Recovery.” Your device should restart and boot into iOS 7.
Full root access in iOS 7.
Launch iFunBox and check the status of your device on the left side. If you don’t see “Jailed” next to your device name and iOS version, the process is complete. You’ll know have full r/w access to root files on your iPhone 4. Keep in mind, you can really mess up a device by playing around with files in the root directory. If something goes wrong, you always have the option to restore the device with iTunes.
Now that your device is jailbroken, you can SSH into it to transfer and edit files. SSHing will give you full access to all the files stored on your device. Before we proceed with the tutorial let’s see what SSH or Secure Shell is: a cryptographic network protocol for secure data communication, remote command-line login, remote command execution, and other secure network services between two networked computers that connects, via a secure channel over an insecure network, a server and a client (running SSH server and SSH client programs, respectively).
Jump over the break to learn how to SSH into your iPhone, iPad or iPod touch…
You need:
1. A jailbroken iOS device – learn how to jailbreak your device here.
2. FileZilla – works on both Mac and Windows ( or any other SFTP client )
HOW TO: ( note: the process is exactly the same on both Mac OS X and Windows )
1. Download FileZilla and install
2. On your iOS device, load Cydia and install OpenSSH
3. !!!IMPORTANT !!! once OpenSSH is installed, you need to change your root and mobile passwords. Learn why and how to do it here.
4. Make sure your iOS device is on the same WiFi network as your computer and load FIleZilla
5. In the upper right corner complete the fields ( as shown in the screenshot below ):
Host: your device’s IP address ( see Settings>Wifi )
Username: root
Password: your new password ( see step 3 )
Port: 22
6. Click on “Quickconnect”. You will be prompted with a message. Click OK ( you can also tick the box where it says “always trust this host” so you won’t be prompted with this message every time you SSH into your device – also you can add this connection to your FileZilla’s favorites for quick access )
7. In a few seconds you will be connected to your device.
8. That’s it. You’re done. Now just be careful. Deleting stuff may result in bricking your device. On the other hand it can also help you unbrick your device. ALWAYS BACK UP YOUR FILES !
WORKING SOLUTION FOR IPHONE / IPAD ICLOUD BYPASS FROM ICLOUDDNSBYPASS.COM
There is an awesome solution for all iPhone users who are impatiently waiting for full Activation Lock bypass and wish to use their smartphone at the same time. Being stuck on iCloud Activation Lock on iOS 7 and iOS 8 is not fun at all. Sometimes you forget your passcode, sometimes you just cannot contact the reseller of the used gadget you purchased online. There are a lot of reasons for getting stuck and one cool solution which allows you to bypass iCloud activation on iPhone 5 / 5S / 5c / 4S / 4 / 6 and 6 Plus, iPad, iPad 2, iPad 3 and all iPod Touch models by connection your device to special server. Developer July Ighor from Ukraine lets users use the DNS server at 78.109.17.60 to stop being locked completely. This solution is using DNS method (like SiriProxy Server) because of better device connection speed.
You cannot make phone calls, play games and launch applications since you don’t have the passcode and this is why you need any iCloud Activation bypass tool that can entertain you for a while. Please, note that this is just a temporary solution. Still it takes time to finish the procedure and to make your wait funner you can use the DNS server offered by the Ukrainian dev. This unique iCloud Activation Lock bypass DNS server is used by over 51,000 gadgets so far.
WHY MOST PEOPLE USE ICLOUD DNS BYPASS SERVER BY JULY IGHOR
Here some features which are only available when using this server: listen to radio, music, record videos, take images and watch videos, browse web, use Socials Apps, etc;
This server supports all versions of iOS firmware and all iPhone and iPad models (included blacklisted devices);
Server is using C++ code. It is very strong and powerful as it can allow thousands of gadgets to connect with only about 2 percent of CPU load;
Server is using DNS routing instead of Proxy method (mostly used by other bypass activation lock servers) which is much more faster;
No extra software needed to Bypass activation lock;
HOW TO BYPASS ICLOUD LOCK ON ANY IPHONE OR IPAD BY USING ICLOUDDNSBYPASS.COM
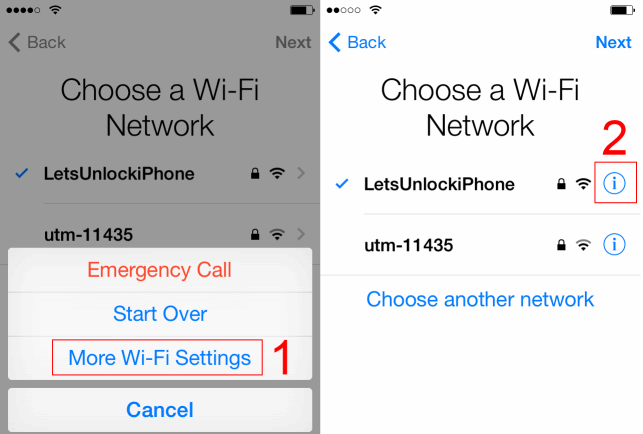
Step 1. Click on Home button of the activation locked device. Select “More Wi-Fi Settings” and click on the ‘i’ icon that appears under Wi-Fi.
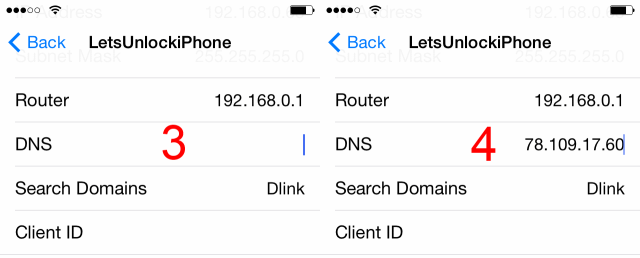
Step 3-4. Check your DNS settings field and enter: 78.109.17.60 (delete any previous DNS ettings)
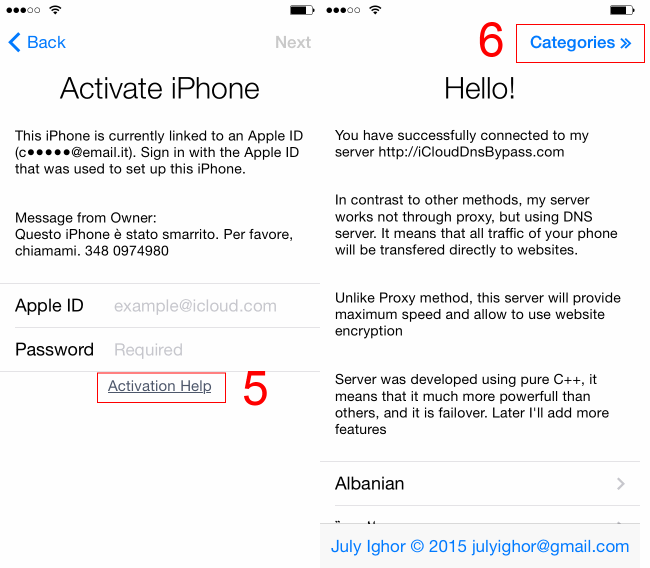
Step 5. Now click on Activation Help link and wait till you see “Hello” message from server.
Step 6. Start using some of the options that weren’t available to you before.
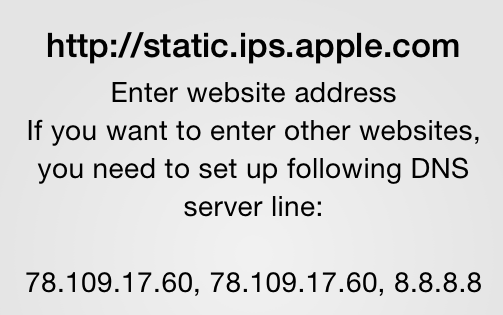
Step 7. (optional) If you want to browse web from your device please enter following to DNS settings field as shown on step 2:
78.109.17.60, 78.109.17.60, 8.8.8.8
NOTES: In case you cannot connect to this server you need to reboot a couple of times. If reboot doesn’t solve the problem it means that your internet provider doesn’t allow you connecting to custom DNS servers. In this case please download iCloud DNS bypass Server GUI and install in to your PC.
This is a great iCloud Activation Lock bypass tool that supports only Windows platform at the moment. At the same time it is available in a lot of foreign languages so you might find your native menu to make the experience much easier and comfortable.
Personally I find this server the best available iCloud bypass solution at the moment. Please feel free to comment your opinion bellow.
1-Microsoft visual studio: vs2005 for win xp & vista /
vs2010 for win 7 / vs2012 for win 8
-Microsoft visual studio should be installed for running
discrete event simulation of opnet projects and for compilation process of the
C++ files used by OPNET.
·These are the environmental variables that should
be configured or added manually by the method used below:
To add these
environmental variables go to (My computer) right click and
choose (properties) then from the left up screen choose (advanced
system settings) then click on (Environmental variables) then from
system variables select (new) to add the variables.
Then copy each variable name and value from the text file or from the
tables below and paste them into the new system variable referred by the number
6 in the figure before according to the machine word architecture and the
visual studio architecture.
For win7-32bit or 64 or win8 select the specific text files which
contains the right paths for the variables to configure the compiler probably.
As shown in the tables below:
(these text files can be downloaded from the links in the bottom of this page)
Table 1. For visual studio 2010 in 32-bit machine
& 32-bit VS, add these environmental variables:
Variable Name
Variable Value
Path
C:\Program
Files\Microsoft Visual Studio
10.0\VC\bin\;C:\Windows\Microsoft.NET\Framework\v3.5\;C:\Windows\Microsoft.NET\Framework\v2.0.50727\;C:\Program
Files\Microsoft Visual Studio 10.0\VC\vcpackages\;C:\Program Files\Microsoft
Visual Studio 10.0\Common7\IDE\;C:\Program Files\Microsoft Visual Studio
10.0\Common7\Tools\;C:\Program Files\Microsoft SDKs\Windows\v7.0A\Bin\
INCLUDE
C:\Program Files\Microsoft Visual Studio
10.0\VC\atlmfc\include;C:\Program Files\Microsoft Visual Studio
10.0\VC\include\;C:\Program Files\Microsoft
SDKs\Windows\v7.0A\include\;C:\Program Files\Microsoft Visual Studio 10.0\DIA
SDK\include\;C:\Program Files\Microsoft Visual Studio
10.0\Common7\IDE\Extensions\Microsoft\Entity Framework Tools\Templates\include\
LIB
C:\Program Files\Microsoft Visual Studio
10.0\VC\atlmfc\lib\;C:\Program Files\Microsoft
SDKs\Windows\v7.0A\include\;C:\Program Files\Microsoft Visual Studio 10.0\DIA
SDK\lib\;C:\Program Files\Microsoft Visual Studio 10.0\VC\lib\
LIBPATH
C:\Windows\Microsoft.NET\Framework\v3.5\;C:\Windows\Microsoft.NET\Framework\v2.0.50727\;C:\Program
Files\Microsoft Visual Studio 10.0\VC\atlmfc\lib\;C:\Program Files\Microsoft
Visual Studio 10.0\VC\lib\;C:\Program Files\Microsoft Visual Studio 10.0\DIA
SDK\include\;C:\Program Files\Microsoft Visual Studio
10.0\Common7\IDE\Extensions\Microsoft\Entity Framework
Tools\Templates\include\
Framework35Version
v3.5
DevEnvDir
C:\Program Files\Microsoft Visual Studio
10.0\Common7\IDE\
FrameworkDir
C:\Windows\Microsoft.NET\Framework\
FrameworkVersion
v2.0.50727
VCINSTALLDIR
C:\Program Files\Microsoft Visual Studio 10.0\VC\
VS100COMNTOOLS
C:\Program
Files\Microsoft Visual Studio 10.0\Common7\Tools\
VSINSTALLDIR
C:\Program Files\Microsoft Visual Studio 10.0\
WindowsSdkDir
C:\Program Files\Microsoft SDKs\Windows\v7.0A\
Table 2. For visual studio 2010 in 64-bit machine
& 32-bit VS, add these environmental variables:
Variable Name
Variable Value
Path
C:\Program Files (x86)\Microsoft Visual
Studio 10.0\VC\bin\;C:\Windows\Microsoft.NET\Framework\v3.5\;C:\Windows\Microsoft.NET\Framework\v2.0.50727\;C:\Program
Files (x86)\Microsoft Visual Studio 10.0\VC\vcpackages\;C:\Program Files
(x86)\Microsoft Visual Studio 10.0\Common7\IDE\;C:\Program Files\Microsoft
Visual Studio 10.0\Common7\Tools\;C:\Program Files (x86)\Microsoft
SDKs\Windows\v7.0A\Bin\
INCLUDE
C:\Program
Files (x86)\Microsoft Visual Studio 10.0\VC\atlmfc\include;C:\Program Files
(x86)\Microsoft Visual Studio 10.0\VC\include\;C:\Program Files
(x86)\Microsoft SDKs\Windows\v7.0A\include\;C:\Program Files (x86)\Microsoft
Visual Studio 10.0\DIA SDK\include\;C:\Program Files (x86)\Microsoft Visual
Studio 10.0\Common7\IDE\Extensions\Microsoft\Entity Framework
Tools\Templates\include\
LIB
C:\Program
Files (x86)\Microsoft Visual Studio 10.0\VC\atlmfc\lib\;C:\Program Files
(x86)\Microsoft SDKs\Windows\v7.0A\include\;C:\Program Files (x86)\Microsoft
Visual Studio 10.0\DIA SDK\lib\;C:\Program Files (x86)\Microsoft Visual
Studio 10.0\VC\lib\
LIBPATH
C:\Windows\Microsoft.NET\Framework\v3.5\;C:\Windows\Microsoft.NET\Framework\v2.0.50727\;C:\Program
Files (x86)\Microsoft Visual Studio 10.0\VC\atlmfc\lib\;C:\Program Files
(x86)\Microsoft Visual Studio 10.0\VC\lib\;C:\Program Files (x86)\Microsoft
Visual Studio 10.0\DIA SDK\include\;C:\Program Files (x86)\Microsoft Visual
Studio 10.0\Common7\IDE\Extensions\Microsoft\Entity Framework
Tools\Templates\include\
Framework35Version
v3.5
DevEnvDir
C:\Program Files (x86)\Microsoft Visual Studio
10.0\Common7\IDE\
FrameworkDir
C:\Windows\Microsoft.NET\Framework\
FrameworkVersion
v2.0.50727
VCINSTALLDIR
C:\Program Files (x86)\Microsoft Visual Studio
10.0\VC\
VS100COMNTOOLS
C:\Program
Files\Microsoft Visual Studio 10.0\Common7\Tools\
VSINSTALLDIR
C:\Program Files (x86)\Microsoft Visual Studio 10.0\
·The difference in the programs file path should
include (x86) if the Visual studio is 32-bit running in 64-bit machine and
this will only run the OPNET 32-bit version if the machine is 64-bit and the
VS is 64-bit also the use Table (3) and it will run OPNET 64-bit.
Table 3. For visual studio 2012 in 64-bit machine
& 32-bit VS, add these environmental variables:
Variable Name
Variable Value
Path
C:\Program Files (x86)\Microsoft Visual
Studio
11.0\VC\bin\;C:\Windows\Microsoft.NET\Framework\v3.5\;C:\Windows\Microsoft.NET\Framework\v2.0.50727\;C:\Program
Files (x86)\Microsoft Visual Studio 11.0\VC\vcpackages\;C:\Program Files
(x86)\Microsoft Visual Studio 11.0\Common7\IDE\;C:\Program Files
(x86)\Microsoft Visual Studio 11.0\Common7\Tools\;C:\Program Files
(x86)\Microsoft SDKs\Windows\v7.0A\Bin\
INCLUDE
C:\Program
Files (x86)\Microsoft Visual Studio 11.0\VC\atlmfc\include;C:\Program Files
(x86)\Microsoft Visual Studio 11.0\VC\include\;C:\Program Files (x86)\Windows
Kits\8.0\Include\um\;C:\Program Files (x86)\Windows Kits\8.0\Include\shared\
LIB
C:\Program
Files (x86)\Microsoft Visual Studio 11.0\VC\atlmfc\lib\;C:\Program Files
(x86)\Microsoft Visual Studio 11.0\VC\lib;C:\Program Files (x86)\Windows
Kits\8.0\Lib\win8\um\x86\
LIBPATH
C:\Windows\Microsoft.NET\Framework\v3.5\;C:\Windows\Microsoft.NET\Framework\v2.0.50727\;C:\Program
Files (x86)\Microsoft Visual Studio 11.0\VC\atlmfc\lib\;C:\Program Files
(x86)\Microsoft Visual Studio 11.0\VC\lib\
Framework35Version
v3.5
DevEnvDir
C:\Program
Files (x86)\Microsoft Visual Studio 11.0\Common7\IDE\
FrameworkDir
C:\Windows\Microsoft.NET\Framework\
FrameworkVersion
v2.0.50727
VCINSTALLDIR
C:\Program
Files (x86)\Microsoft Visual Studio 11.0\VC\
VS100COMNTOOLS
C:\Program Files (x86)\Microsoft Visual
Studio 11.0\Common7\Tools\
VSINSTALLDIR
C:\Program
Files (x86)\Microsoft Visual Studio 11.0\
·The difference here is in the visual studio version
for VS2012 it's 11.0. if you use visual studio 64-bit in 64-bit machine then
you should remove (x86) and use the 64-bit OPNET, use this table as it; if the Visual studio 2012 is 32-bit running
in 64-bit machine and this will only run the OPNET 32-bit version.